Neck Pain Causes and Solutions

Are you experiencing chronic neck pain? Do you feel like you’re always holding tension in your neck, and no matter how many stretches you do, it just does not seem to resolve? Today, we’re going to talk about some root causes of neck pain. Also, of course, some solutions for it. 

Rather watch or listen? 

4 Neck Pain Causes

1. Breathing and/or airway dysfunction

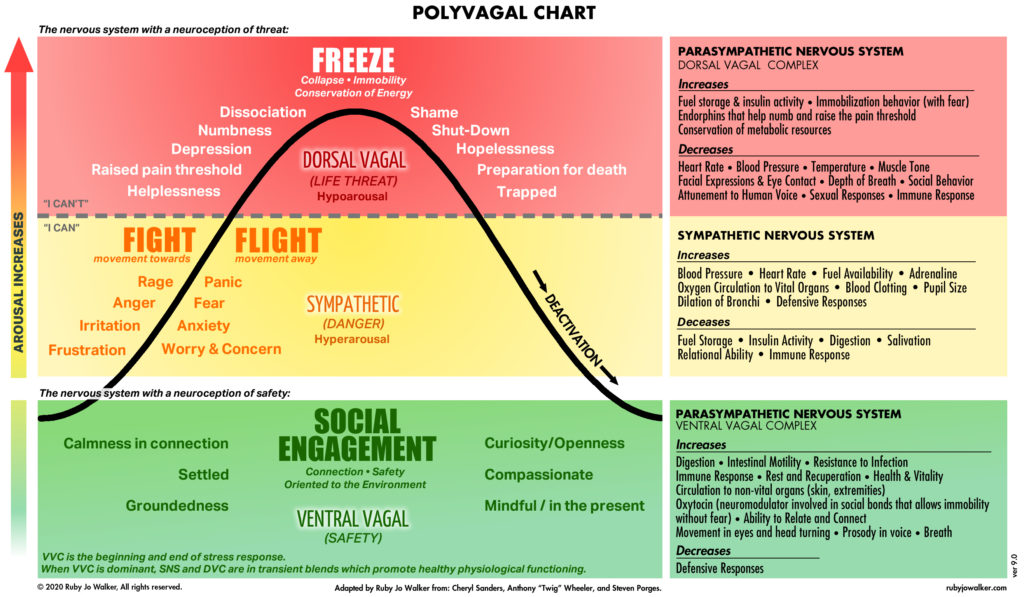
Let’s start with one of the biggest issues, which is some type of breathing and/or airway dysfunction. This means that we can be in a sympathetic state, indicating that we’re in that fight or flight state. This means that we’re going to be breathing from our neck and shoulders. 

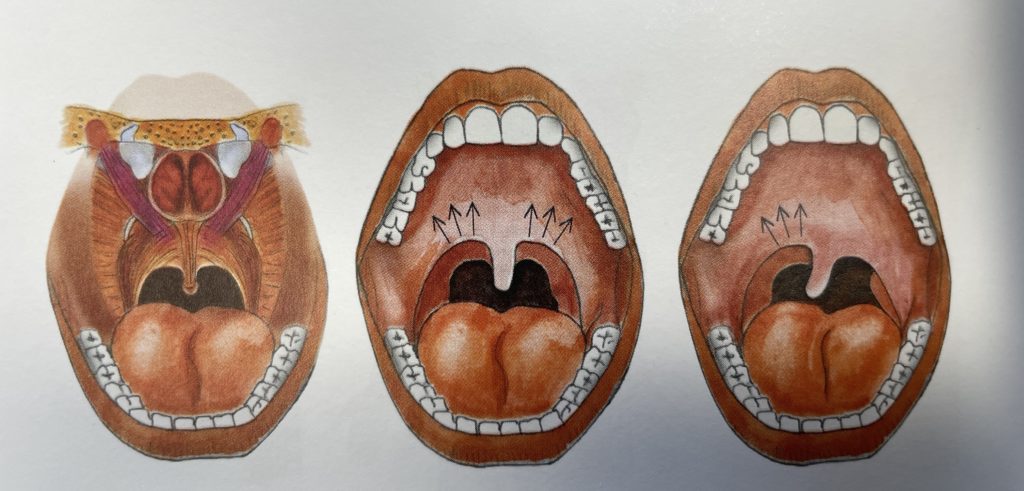
We breathe 25,000 times a day. So, if every breath is coming from here, you can appreciate how tight this is going to be. We can also have an airway dysfunction, indicating that there could be a deviated septum, a narrow airway, or changes in the jaw. Even poor tongue posture can play a role in exacerbating these issues.

In essence, many things might indicate that there is an airway issue contributing to poor breathing throughout the day and during sleep. 

2. Posture

Although there’s no clear link between posture and neck pain, we want to think about any potential compensatory patterns that we have in our body, as they can ultimately lead to compensation in movement and, potentially, pain.

For instance, if you spend long hours at your desk staring at a computer, you might develop certain habits. If you’re always looking at the screen to the left, your muscles and tissues may adapt to that position over time, becoming shorter and possibly causing discomfort.

This doesn’t mean you can’t move your head in different ways, but it’s worth paying attention to regular activities to see if there’s a chance to adjust and put yourself in a better position. Making small changes might help prevent potential pain down the road.

3. Headaches or migraines

If you’re experiencing any ongoing headaches or migraines, this often can be associated with neck pain. But, once again, we want to understand the underlying causes of that. Many times, it can be associated with jaw clenching, which can be correlated with airway dysfunction.

4. Lack of stability or motor control

Neck pain occurs when the neck compensates for a lack of stability or motor control, which we refer to as sequencing, timing, and coordination, somewhere else in the body. A good example of that is our core or abdominal area. It’s a beautiful balance of having the respiratory diaphragm work in synergy with our pelvic diaphragm, and all these muscles need the right coordination to stabilize our spine. This way, we can generate force and move efficiently in everything we do.

If we lack stability in the core, then something in the body has to figure out what to do for that. So often, that can be the neck. For instance, if you are trying to do a core exercise on the ground, and instead of the core really doing what it’s supposed to do, you start to get tension and abnormal tension in your neck. It’s a perfect example of how this could happen.

5 Neck Pain Solutions

So what can you do about it? 

1. Optimize your breathing

Let’s talk about some key points. First, address your tongue position. The resting tongue position should be on the roof of the mouth, gently touching the top teeth. This allows our airway to open so we can get optimal breath. We want to think about breathing in through the nose, and instead of breathing straight back, think about breathing up. As you breathe in, aim for full expansion in the abdomen. Think of it as a 360-degree breath—front, back, and sides of the abdomen. This creates inter-abdominal pressure. As you exhale, the abdomen contracts and the ribs come down.

If you feel like you can work on your breathing and improve it over time, that’s amazing. If it seems challenging to improve, you might need to explore other options to identify if there is indeed some structural airway issue that may need addressing.

2. Stop stretching

Often, when we have neck pain, our instinct is to stretch and stretch. When anything is tight in the body, these muscles are doing exactly what we need at the time—they’re protecting us. So if there’s a lack of stability somewhere else, if breathing is not optimal, then our body is doing what it needs to do to compensate and maintain homeostasis or balance.

We want to be kind to it. If we just take away that compensation, it might have a temporary fix, but it won’t be an ongoing solution. Instead, I love recommending the salamander stretch

You’ve probably seen this in my other blogs and videos, but it’s worth repeating. This is based on Stanley Rosenberg’s work. Interlace your fingers, bring them behind the back of your head, and relax your arms. Keep your arms down, side bend your upper body and look with your eyes in the opposite direction. Hold this for about 30 seconds. You might experience a sigh, swallow, or yawn—a sign of relaxation. Come back to center, then switch to the other side, eyes in the other direction, holding for 30 seconds. Before and after you perform this exercise, I recommend checking your range of motion. Normally, there is an immediate improvement afterward.

3. Identify any habitual patterns

Is your computer screen over to the left? Can you move it right in front of you? Are you on your phone for hours looking to the right? Just observe these things that you might be doing all day long and consider making some modifications. You don’t need to have perfect posture all day long—I’m not suggesting that. But it might be beneficial to change some of these habits that you’re doing for hours and hours a day.

4. Create stability and strength in the rest of the body

Learn how to build a resilient body. I know that might sound like a lot, but when we think about becoming stronger from the ground up, from our feet up, we can establish a strong connection and have a foundation for stability, strength, and mobility. This way, our neck doesn’t need to compensate all the time. When there’s chronic neck pain, unpacking things such as optimizing breathing, building stability and mobility (for example, in the thoracic spine), and then building strength can truly shift the trajectory of your pain in a lasting way.

5. Identify causes of chronic pain

And last but not least, whenever we have chronic pain, we want to consider a couple of other things. First, is there any systemic inflammation occurring? Are there factors such as certain foods, hormonal imbalances, or chronic stress playing into this systemic inflammatory response, especially when the pain persists? Additionally, we want to distinguish between acute pain and chronic pain. 

Chronic pain involves central sensitization, where our brain perceives a high alert of pain all the time. We need to learn how to use nervous system regulation and other strategies to down-regulate the nervous system, recognizing pain as information and shifting from a heightened sense to pain associated with a specific movement pattern. In chronic pain, there is no tissue damage at that point, whereas in acute pain, there can be tissue damage.

As always, I hope this helps you understand your neck pain a little bit more and, of course, some of the things that you can do to begin to change your pain and improve your health.

If you found this information helpful, please be sure to give it a like, share it with others, leave a comment below, and, of course, subscribe to our YouTube channel, The Movement Paradigm®, for weekly tips on mindset, nutrition, and movement. 

If you’re looking for personalized guidance on your journey and feel that you need an individualized approach, please don’t hesitate to reach out to us. We would welcome the opportunity to assist you.

If you’re interested in accessing a wide range of programs, including those on nutrition, somatics, and vagus nerve exercises, as well as movement programs to help you optimize your overall wellness, consider checking out our app, The Movement Paradigm, available on both Apple and Google platforms.

Other things that might interest you:

4 ways to improve pelvic mobility in your gait

Are you experiencing hip pain, back pain, or even knee pain when walking or engaging in other dynamic activities such as climbing stairs or running? Do you find yourself constantly searching for the perfect shoe or feeling like something just isn’t quite right? Your gait is one of the most powerful assessments of movement efficiency, revealing how you interact with the ground. The way you absorb impact and utilize it as energy is profound. 

Today, we’re going to delve into the topic of pelvic mobility and how it influences your gait cycle. We’ll also explore some exercises that can help you improve your walking, dynamic movements, and even running if that’s something you’re interested in.

Rather watch or listen? 

What you need to know about pelvic mobility

When walking, we encounter 1.5 times our body weight in force. When running, we encounter up to three to four times our body weight in force. And when we’re jumping, it could be up to eight times our body weight in force. That means that we have to be efficient about how we interact with the ground.

After doing probably thousands of gait assessments at this point, I’ve realized that there are some common themes, and one of them is something that is often ignored: pelvic mobility

We’re always thinking about what we need to stretch or what we need to strengthen. But we also want to consider how the pelvis moves in our gait cycle. We actually need proper rotation of the pelvis, side bending of the pelvis, and forward and backward motion. Any excessive movement or limitations in these aspects can affect our stride length, how we interact with the ground, and the impact force coming through our body.

So, although there are many things to talk about with gait, we’re going to zero in on pelvic mobility today. For example, Kim et al. showed that in chronic stroke patients, an anterior pelvic tilt, which is when your pelvis is forwardly tipped, affects balance and symmetry. These simple factors can have a significant impact on our overall function.

Ways to improve your pelvic mobility

1. Pelvic mobility from the floor

Place your hands on your hips and forward bend, tipping your pelvis forward and arching your back. Then, bend the pelvis backwards, flattening your back to the floor. Repeat this motion a few times, initially assessing if you feel any discomfort, if the motion is smooth, or if there’s any shaking. Notice if it feels limited in one direction more than the other.

Next, move into side bending. From here, bend your hip toward your shoulder, then return to the center. This can serve as both an assessment and an exercise. When using it as an exercise, focus on your breath. Inhale and exhale as you flatten your back in the forward backward bending, and if you’re doing the side bending, inhale deeply with a diaphragmatic breath and exhale as you go into a side bend. Once again, observe if there’s symmetry between the sides or if one side feels painful or crampy. All of these observations are essential.

2. Table position

Come up into a table position, and you’ll perform the same exercises from here. Focus on initiating the movement from the pelvis, not the upper back. As you go into the forward bend, tilt the pelvis forward, and as you go into the backward bend, tilt the pelvis backward. Coordinate this movement with your breath. Inhale as you tilt the pelvis forward, allowing the abdomen to expand. Exhale as you tilt the pelvis backward.

When moving into the side bend, think of it as “wagging the tail.” Breathe in, and then exhale as you perform the side bend. Pay attention to whether there’s symmetry on both sides or if it feels restricted. All of these observations are essential for how you would perform the exercises.

3. Pelvic rotation in table 

From table position, straighten one leg and rotate the pelvis toward the stable leg on the ground. Take a breath in, and then exhale as you drop your pelvis into this hip, and then bringing it back up to neutral. Inhale, and return to neutral. This exercise is really helpful for working on rotating the pelvis into a stable leg.

4. Airplane exercise

This exercise focuses on maintaining a stable hip while moving the pelvis toward the stable leg. Stand on your right leg and position your left leg as a kickstand. You can start with a breath in as you rotate your pelvis into your right leg and exhale as you bring it back to neutral. You can also progress this to single leg (no kickstand). Inhale and exhale as you return to a neutral position. This is a challenging exercise, and I recommend mastering the others first before advancing to this one.

All of these exercises can be powerful in improving your gait and how you interact with the ground. I recommend performing them in order, ensuring you can do the first-level exercises before moving on to the standing ones. Of course, you can integrate these into a comprehensive program that includes strength, stability, and mobility exercises. This can significantly impact your overall gait.  

If you found this information helpful, please like, share, and subscribe to our YouTube channel, The Movement Paradigm®, for weekly tips on mindset, nutrition, and movement. If you want to join our app and join our community, please make sure to check out the Movement Paradigm app on Google or Apple. Get a 7-day FREE trial!

If you’d like to learn more about how we can assist you on your journey, please don’t hesitate to reach out for a discovery session. We look forward to helping you on your path to wellness.

Other things that might interest you:

3 Reasons You Have Tight Hamstrings

Today, we are going to discuss three different reasons why you might have tight hamstrings. Whether it’s you or someone you know, tight hamstrings are a common issue. I’ve worked with many patients and clients over the decades, and it’s essential to understand the underlying causes.

Rather watch or listen? 

At this point, I’ve encountered numerous cases of tight hamstrings. However, the reasons behind tight hamstrings can vary significantly from one person to another. The three key factors we’ll explore are:

3 Reasons You Might Have Tight Hamstrings

1. Mechanical Tension

When we think of mechanical tension, imagine our body’s tissues as elastic, like a spring. 

Our fascial tissue, which envelops our muscles and organs, is responsible for maintaining elasticity and tension. However, various factors such as muscle imbalances, compensations, injuries, or conditions like torn hamstrings and tendinopathies can disrupt this tissue’s integrity. This disruption can lead to mechanical tension, including fibrosis, where the tissue loses its elasticity due to change. Emotional trauma can also have its impact on this over time. 

To address this, consider techniques like self-myofascial release, using balls or foam rolls to enhance tissue elasticity.

2. Neurological Tightness

Neurological tightness involves an increased neural drive to the hamstrings or the body’s posterior chain, back of the body. This can manifest as shaking when attempting movements like touching your toes or pulling your hamstring back. In such cases, the neural “volume” is dialed up, and we need to focus on inhibiting it, essentially turning down the volume. 

Neurological tightness can also be related to nerve tension, often stemming from conditions like sciatica. Reprogramming this requires specific exercises, such as leg lifts against a wall, gradually reducing the feeling of increased pulling behind the knee while promoting a comfortable stretch. Then, engaging the core and creating tension in the body further aids in reprogramming the nervous system while actively pulling the leg away from the wall. 

3. Stability Motor Control Dysfunction

Stability motor control dysfunction occurs when there’s a lack of coordination, timing, or sequencing in the core and pelvis, making it challenging to perform certain movements, like touching your toes. Even if there’s no significant tissue tightness, this dysfunction can mimic the symptoms of neurological tightness or even mechanical tension.

An effective remedy is to introduce stability and improved sequencing. For instance, try placing a block between your knees and elevating or lowering your toes while reaching down to touch them. This simple adjustment changes weight distribution and core activation, often leading to quick improvements.

Key Takeaways

It may be challenging to self-assess these issues, but consider your history, any past injuries or trauma to your legs, and how your hamstring tissue feels overall. Additionally, assess how quickly you can change your movement pattern when activating your core, as this might indicate a stability motor control issue. If you experience increased shaking and poor control, it could be related to neurological tightness.

In conclusion, not all tight toe touches are the same. Each case should be addressed uniquely, as optimizing this fundamental movement pattern is crucial for overall function and performance in daily life.

If you found this information helpful, please like, share, and subscribe to our YouTube channel, The Movement Paradigm®, for weekly tips on mindset, nutrition, and movement. Explore our other resources for in-depth insights into core function, hip mobility, pelvic floor health, and more to better understand your body and how to optimize it.

If you’d like to learn more about how we can assist you on your journey, please don’t hesitate to reach out for a discovery session. We look forward to helping you on your path to wellness.

Other things that might interest you:

What to expect and not to expect from physical therapy

Are you wondering what you should expect from physical therapy? Or maybe what you should not expect? As a physical therapist for the past 12 years and as a movement specialist for the past 24 years, I can confidently share what you deserve in physical therapy.

Rather watch or listen? 

What you should expect from physical therapy

1. Thorough evaluation

You deserve a thorough evaluation, no matter what you are reaching out to physical therapists for, whether that’s movement issues, chronic pain, acute pain, vestibular, balance issues, post surgery, pre surgery, or any other reason.

That means not only a physical therapist should be looking at your current symptom (s), but they are looking to figure out why they happened in the first place, even during post-surgical cases. A thorough evaluation includes looking at a detailed movement assessment, where your compensation patterns lie, what might be driving some of the issues you’ve had, and all of your modifiable lifestyle factors. How is your sleep? How is your nutrition? How are your relationships? How is your stress management? If your therapist is missing these details, they are missing a huge element of helping you heal.

2.  Practicing what they preach

You deserve a physical therapist who practices what they preach, whether that’s movement, balance, or exercise. They should be a health leader, educator, and movement specialist, and because of that, they have an obligation to be able to do the things that they are recommending that you should do.

3. 1-on-1 care

It is hard to find 1-on-1 care in today’s healthcare environment. I worked in the outpatient practice for eight years, so I understand a busy outpatient setting, and unfortunately, the demands of insurance companies are dictating this. However, you deserve to be able to be the only person in the room, to be listened to, and to have your therapist understand your diagnosis, prognosis, underlying causes, current concerns, goals, and plan of care without being pulled in a million directions. One-on-one care is extremely important, whether that’s 30-minute sessions or 60-minute sessions.

4. Someone who will look at you as a whole person

You should expect someone who listens to your story and understands that you are not a “shoulder problem,” you are not a “hip injury,” and that you are a person; you are human with a story and emotions and thoughts and all the things that make you wonderful. So, make sure that someone is looking at you as a human with a beautiful story, not just an injury.

5. Mindful and intentional movement

You should expect a therapist to help you perform mindful, intentional movement to help guide you to move with interoception, internal awareness of self, to be able to understand movement quality, as opposed to high-volume exercises with poor form.  As movement educators, one of the greatest gifts we can share with you is to help you move your body the way it was intended to so that you can continue to do the things you love.

What you shouldn’t expect from physical therapy

What are some of the things that you should not expect from physical therapy? This is equally as important.

1. You should not be on things that will not help you get well

You should not be on hot packs, cold packs, electrical stimulation, ultrasounds, or other modalities that aren’t helping you get well. They are sometimes time-savers for the therapist, but they are not actually creating better movement in your body. They’re not getting to the root of your issue. They are not moving you forward, and you want to be able to maximize your time spent in physical therapy.

2. You shouldn’t be warming up on machines

You don’t want to get to physical therapy and go on the treadmill or bike to warm up for 10 or 15 minutes. You want to learn how to move your body. Every minute counts!

3. You shouldn’t be on tons of band exercises

You should not be going through tons and tons of band exercises with poor form without guidance. Especially when you feel like you are going through the motions and you could do this at home.

If you feel like you could do that at home, that’s your first sign that this is not a good fit.

I want everyone to believe in physical therapy. We have an amazing opportunity to share with you the gift of movement.

In summary, when you think physical therapy is a waste of time, you’re put on machines and lots of modalities, and you feel like you are competing for your PT’s attention, you deserve better.

Please make sure to find a great physical therapist in your area who does one-on-one care, that looks at you as the whole person, that addresses potential root causes of your injury or your pain or any other issue that you might be experiencing.

If you need help, please reach out to us, we do virtual and in-person care, and we perform holistic physical therapy. Schedule your evaluation here: https://p.bttr.to/3qHXz8i

If it was helpful, give it a like, share it, and subscribe to our YouTube channel, The Movement Paradigm, for weekly tips on mindset, nutrition, and movement.

Other things that might interest you:

3 ways to treat your acute low back pain

Pelvic floor–Gut Connection

A neck exercise that really works

HOW TO TEST YOUR VAGUS NERVE | Polyvagal Theory

Did you know that you can test your vagal nerve function, and not only can you test it, but you can begin to tap into the healing power of the vagus nerve? Your vagus nerve is responsible for the regulation of internal organs such as digestion, heart rate, respiratory rate and impacts certain reflex actions like coughing, sneezing, and swallowing. It is critical to optimal health and you can tap into it-but first, find out what state you’re in.

The Polyvagal Theory

Before we jump into how you can assess the vagal nerve, let’s talk a little bit about the autonomic nervous system. We used to think of the autonomic nervous system as simply fight or flight or rest and digest. However, Dr. Steven Porges’s work shows us that there’s much more to it and there are actually three circuits of our autonomic nervous system. This is referred to as the polyvagal theory.

Essentially we have our fight or flight state, which is also considered our sympathetic spinal activation. We also have our dorsal vagal state, referring to the most primitive vagal nerve, and indicates we are in a freeze state. This means we are shut down and feel hopeless. We are disassociated from ourselves and other people.

Lastly, we have the ventral vagal circuit, which means we are in a state of social engagement-a state of safety. This means we are connected to the greater world. We’re connected to ourselves. We are joyful and mindful. All three of these are critical and during the day we go through all of these different circuits, but most often we don’t even recognize that we do because we go through them so quickly. However, we can get stuck in these. We can get stuck in a fight or flight stress response where we’re constantly worried, anxious, frustrated, or irritated. It’s also easy to remain in a shut-down mode. We of course could be mindful and joyful. We’re constantly fluctuating.

polyvygal chart
Adapted by Ruby Jo Walker

Check out our previous blog on “How to Map your Nervous System” here.

Breaking that down a little further, let’s speak about the ventral vagal nerve. This originates from the brainstem just as the dorsal vagal nerve does. This innervates most of the muscles of the throat, such as the larynx, pharynx, uvular muscles as well as the levator palatini muscles in the back of the throat. Whereas our dorsal vagal nerve, which is more subdiaphragmatic, innervates the muscles of the stomach, liver, and digestive system. It also does innervate the muscles of the heart and lungs. Just a reminder, the dorsal vagal nerve is impacting that freeze state, shutdown mode, whereas the ventral vagal is eliciting that sense of inner calm and relaxation and is associated with our state of safety or state of social engagement.

Testing Ventral Vagal Function

You may need a partner for this. This is a really powerful technique that can have a profound impact on how you address your body. Remembering where all the powerful neural innervations are, one of the innervations of the ventral vagus nerve is the throat.

  • Grab a partner and a flashlight.
  • Have your partner look at the inside of the mouth at the back of the throat at the uvula that drops down right in the center.
  • Now, perform an “ah, ah, ah” sound.
  • When you open your mouth, you can use a tongue depressor or your fingers to push down your tongue so the uvula and soft palate can be more visible.
  • The examiner is going to look at the uvula to see if there is a deviation to one side.  
three mouths anatomy
Adapted from Stanley Rosenberg’s Healing Power of the Vagus Nerve

What you’re looking for, specifically, is if there’s any deviation from one side to the other. If the uvula pulls over to one side, then that is indicative of ventral vagal nerve dysfunction. If it moves up symmetrically, then that means that you are in that state of social engagement. So, if you have the soft palate moving up on one side, let’s say it’s moving up on the left side, and not moving up on the right side, then that would be indicative of a dysfunction of the pharyngeal branch of the ventral vagal nerve.

Now, that you’ve tested let’s move into how to stimulate the vagus nerve.

Vagus Nerve stimulation: The basic exercise

If your test indicated that you had a ventral vagal nerve dysfunction, perform the basic exercise for vagus nerve stimulation.

  • Lie on your back on the ground.
  • Interlace your fingers and bring them behind your head- right at the base of the skull
  • Look with your eyes to the right until you sigh, swallow, or yawn, and then repeat on the other side.
  • You may blink during the exercise.

Now that you’ve stimulated it, retest your vagal nerve and see if there was a change.

This is just one way to measure your autonomic nervous system function. This is also just one way out of many to stimulate your vagus nerve. However, recognize there are so many ways to become more aware, more in tune, and map your nervous system. You are completely in control of what’s happening in your life.

I want to give a huge thank you to Dr. Steven Porges for all of his amazing work in this area, as well as Stanley Rosenberg, for their contributions to this area of life-changing research. Make sure to check out the book, Accessing the Healing Power of the Vagus Nerve, by Stanley Rosenberg.

If you’d like to schedule a free 15-minute virtual discovery session, please email [email protected] or text 302-373-2394 to schedule. We’d love to help you get healthy again!

For more content, make sure to subscribe to our YouTube channel here.

Why you should stop “stretching” your hip | HIP PAIN

Do you have hip pain that you are continually trying to stretch, roll, or smash, and nothing seems to get better?  Before we get into the role of the psoas, one of your key hip flexors, let’s speak about the local stabilizers and global stabilizers of the body. This is important to understand how you are going to treat your hip flexors and hip pain.

Think of the local stabilizers as being muscles that are close to the joint. They create more of an isometric contraction versus concentric (shortening) or eccentric (lengthening) contraction. They control the joint centration which means keeping the joint centered in its axis. It’s also independent of the activity of motion so if you raise your arm overhead, the deep stabilizers in my spine are going to activate before your arm goes overhead. Essentially these local stabilizers are imperative for stabilization in the body so that we can have proper movement.

Our global stabilizers are equally as important. However, they have a different role, so they have more of an eccentric contraction. They decelerate the range of motion, are continuous with motion, and are farther away from the joint.

Now getting back to the psoas, which is what everyone wants to stretch when they have hip pain.  The posterior or the back of the psoas is a local stabilizer. Think of it as one of our deep core muscles that is helping to stabilize the spine and also prevent the femur, our leg bone, from shifting forward in the hip joint. The anterior or front of the psoas serves as a global stabilizer. So, it is necessary to think of the psoas muscle as a stabilizer. Not only is it a stabilizer but it works in an integrated unit with all of the other muscles, including the pelvic floor, diaphragm, multifidus, the deep five rotators in the hip, and the transverse abdominus. All of these have to work together, and once again in this integrated fashion to be able to stabilize the low back and the pelvis during any kind of movement.

For example, if you performed a chest press with 30 pound in each hand on a bench and then transitioned into doing that on a stability ball, your weight would naturally go down. Why? Because you now have an unstable platform to work from and therefore can not generate as much force.

There are a lot of different hip pathologies that we won’t get into today, but when you have hip pain it typically happens from losing the deep stability of the hip. There are two common muscle imbalances that will exist. One is the TFL(tensor fascia latae) muscle, which is right in the front lateral side of the hip, can get tight, especially with increased sitting. Based on this attachment, it will pull the hip forward, and that will therefore inhibit or shut down the psoas. The other common muscle imbalance is the hamstring muscles, which can get tight for various reasons, inhibiting the glute muscles. The hamstrings can push the femur forward and that also leads us to lose that optimal position on the hip joint. Overtime if we have these muscle imbalances, instead of the hip being centered in the axis, it will start to shift forward and up. This will cause all types of pain issues and pathologies. Whether that’s a labral tear, hip impingement, tendinopathy, bursitis, and so on. So, it is important to get the hip stabilized and centered in the joint in order to decrease pain and ultimately improve function.

You can begin to do this through a four-step process. This is a great way to begin to address your pain, as well as any kind of movement compensation, and most importantly, integrate your foot with your core, in a very integrated manner. First is inhibiting the tissue, in this case we inhibited the TFL muscle that typically pulls the hip joint forward and creates that inhibition of the psoas as a deep stabilizer. Then, mobilize the hip joint to center the hip joint. Remember that when it is not in that center position it’s shifting forward enough so we’re shifting it back to the center position. Next, stabilize it by activating the deep stabilizers, such as our diaphragm, pelvic floor, etc. Then we’re integrating it with the ground. This is super important because the foot is part of the core and they work as an integrated unit. To get those deep stabilizers of the hip firing, short foot, i.e. foot to core sequencing, allows us to do that in a very integrated fashion.

4 Steps

1. Inhibition

For the TFL release, place the ball right on the outside of the hip. When you lie down, you’ll naturally rotate the hip in, which will expose the TFL muscle. With the other leg, anchor it up at a 90-degree angle and come down to your forearms. Holding that position your leg will be nice and long, naturally rotated in, and breathing throughout the exercise trying to relax into it.

2. Mobilization

For the hip mobilization with a band, you’ll place the band high up in the groin. You’ll have it back at a 45-degree angle away from you. You’ll start in a table position rocking forward 15 times, making sure your spine stays nice and long, and you’re breathing. Then rock away from the band, so to the opposite side, once again about 15 times, making sure you’re breathing throughout the exercise.

3. Activation

Now it’s time to activate the deep core, so you can do this by diaphragmatic breathing. Inhale, breathing into the abdomen and into the base of the pelvis allowing the abdomen to expand 360 degrees. Exhaling, letting the abdomen contract and the belly button in towards the spine. Once you feel like you have this established, then on your inhale allow the pelvic floor to relax, so you can exhale and gently lift the pelvic floor about 20% contraction to get a deeper integration. You want to think of this as a rhythmical balance, so nice and fluid. Inhaling to the base of the pelvis and exhaling gently lifting the pelvic floor.

4. Integration

Lastly, it’s time for integration. This is to be done with short foot. Standing on one leg, sitting the hips back, knees slightly bent, taking a breath in, while your foot relaxes then exhale and gently root the tips of the toes into the ground. That will naturally lift the arch and lift the metatarsal heads or ball of the foot.

So whether you have hip pain or hip tightness and are constantly stretching your hips, hopefully, this video will give you a little bit of insight to allow you to think about your hip differently and recognize that it is part of an integrated unit. It is really important to understand how that works as it relates to stabilization and movement

If you’d like to schedule a free 15 minute virtual discovery session, please email [email protected] or text 302-373-2394 to schdule. We’d love to help you get healthy again!

For more content, make sure to subscribe to our YouTube channel here.