How to Burn More Calories During Your Day | NEAT

Did you know that you can burn almost 350 additional calories each day, which is equivalent to 30 pounds per year if you include more NEAT in your life? NEAT stands for Non-Exercise Activity Thermogenesis. It is defined as any other type of activity that is outside of your purposeful physical training. Think of this as the energy expenditure related to the daily maintenance of your body, leisure activities, occupation, and all of the things outside of your intended physical 30 to 60 minutes at the gym.

Rather watch or listen than read?

There are three different categories of NEAT that you can include. These include body posture variations, ambulation/locomotion, and fidgeting. We will discuss each one of these and how to include them in your daily routine.

3 Ways to Include NEAT:

1) Body Posture Variation

One of the most important things that we should all consider is to assume as many different positions and postures as possible during our day. There is no one good or bad posture. The best posture is the next posture, so you want to think about constantly changing positions. There isn’t such a thing as perfect ergonomics, it’s really about moving consistently throughout the day. Are you sitting, standing, waling, moving, and weight shifting? Are you able to sit down onto the ground and get back up? The more that we can assume different variations of postures of sitting, standing, and moving, the better. Our bodies crave movement, so let’s give them what they deserve. 

2) Ambulation or Locomotion

How can you increase your steps throughout the day? You can use a monitor to track how many steps you’re getting a day. Use that as a goal to slowly increase your steps to your day. Let’s not forget about all the locomotive patterns like crawling or skipping; any ways that you can begin to reinforce one of our most powerful movements in our body, which is walking. It is the most powerful assessment of movement efficiency. The more you can begin to increase steps and dynamic movement throughout the day, the better.

3) Fidgeting 

This can be twirling your hair, rubbing your head, or tapping your foot. If you are doing this 150 minutes a day, this can, in turn, burn 350 calories a day, which is equivalent to 30 pounds per year. Every time you’re in your chair or you’re standing at your work desk, think about how you can add a little bit of extra movement in. This will increase NEAT and can be beneficial in metabolism and your weight loss goals or maintenance. 

In today’s movement culture, we are so focused on performing 30 to 60 minutes of physical activity most days of the week. Instead, we want to think about this from a movement mindset perspective and move most hours of each day. That begins with incorporating some of these most fundamental things like walking more, fidgeting more, and changing and assuming different positions. Once we can begin to incorporate these things, we can make such a profound difference in our movement and overall health. Once again, our bodies crave movement, they do not crave sustained positions. 

Reach out for a 15-minute FREE discovery session to see how we can help you on your journey.

For more content, make sure to subscribe to my YouTube channel here.

Other things that may interest you:

IS YOUR GUT PREVENTING YOUR WEIGHT LOSS?

Why you should stop “stretching” your hip | HIP PAIN

Do you have hip pain that you are continually trying to stretch, roll, or smash, and nothing seems to get better?  Before we get into the role of the psoas, one of your key hip flexors, let’s speak about the local stabilizers and global stabilizers of the body. This is important to understand how you are going to treat your hip flexors and hip pain.

Think of the local stabilizers as being muscles that are close to the joint. They create more of an isometric contraction versus concentric (shortening) or eccentric (lengthening) contraction. They control the joint centration which means keeping the joint centered in its axis. It’s also independent of the activity of motion so if you raise your arm overhead, the deep stabilizers in my spine are going to activate before your arm goes overhead. Essentially these local stabilizers are imperative for stabilization in the body so that we can have proper movement.

Our global stabilizers are equally as important. However, they have a different role, so they have more of an eccentric contraction. They decelerate the range of motion, are continuous with motion, and are farther away from the joint.

Now getting back to the psoas, which is what everyone wants to stretch when they have hip pain.  The posterior or the back of the psoas is a local stabilizer. Think of it as one of our deep core muscles that is helping to stabilize the spine and also prevent the femur, our leg bone, from shifting forward in the hip joint. The anterior or front of the psoas serves as a global stabilizer. So, it is necessary to think of the psoas muscle as a stabilizer. Not only is it a stabilizer but it works in an integrated unit with all of the other muscles, including the pelvic floor, diaphragm, multifidus, the deep five rotators in the hip, and the transverse abdominus. All of these have to work together, and once again in this integrated fashion to be able to stabilize the low back and the pelvis during any kind of movement.

For example, if you performed a chest press with 30 pound in each hand on a bench and then transitioned into doing that on a stability ball, your weight would naturally go down. Why? Because you now have an unstable platform to work from and therefore can not generate as much force.

There are a lot of different hip pathologies that we won’t get into today, but when you have hip pain it typically happens from losing the deep stability of the hip. There are two common muscle imbalances that will exist. One is the TFL(tensor fascia latae) muscle, which is right in the front lateral side of the hip, can get tight, especially with increased sitting. Based on this attachment, it will pull the hip forward, and that will therefore inhibit or shut down the psoas. The other common muscle imbalance is the hamstring muscles, which can get tight for various reasons, inhibiting the glute muscles. The hamstrings can push the femur forward and that also leads us to lose that optimal position on the hip joint. Overtime if we have these muscle imbalances, instead of the hip being centered in the axis, it will start to shift forward and up. This will cause all types of pain issues and pathologies. Whether that’s a labral tear, hip impingement, tendinopathy, bursitis, and so on. So, it is important to get the hip stabilized and centered in the joint in order to decrease pain and ultimately improve function.

You can begin to do this through a four-step process. This is a great way to begin to address your pain, as well as any kind of movement compensation, and most importantly, integrate your foot with your core, in a very integrated manner. First is inhibiting the tissue, in this case we inhibited the TFL muscle that typically pulls the hip joint forward and creates that inhibition of the psoas as a deep stabilizer. Then, mobilize the hip joint to center the hip joint. Remember that when it is not in that center position it’s shifting forward enough so we’re shifting it back to the center position. Next, stabilize it by activating the deep stabilizers, such as our diaphragm, pelvic floor, etc. Then we’re integrating it with the ground. This is super important because the foot is part of the core and they work as an integrated unit. To get those deep stabilizers of the hip firing, short foot, i.e. foot to core sequencing, allows us to do that in a very integrated fashion.

4 Steps

1. Inhibition

For the TFL release, place the ball right on the outside of the hip. When you lie down, you’ll naturally rotate the hip in, which will expose the TFL muscle. With the other leg, anchor it up at a 90-degree angle and come down to your forearms. Holding that position your leg will be nice and long, naturally rotated in, and breathing throughout the exercise trying to relax into it.

2. Mobilization

For the hip mobilization with a band, you’ll place the band high up in the groin. You’ll have it back at a 45-degree angle away from you. You’ll start in a table position rocking forward 15 times, making sure your spine stays nice and long, and you’re breathing. Then rock away from the band, so to the opposite side, once again about 15 times, making sure you’re breathing throughout the exercise.

3. Activation

Now it’s time to activate the deep core, so you can do this by diaphragmatic breathing. Inhale, breathing into the abdomen and into the base of the pelvis allowing the abdomen to expand 360 degrees. Exhaling, letting the abdomen contract and the belly button in towards the spine. Once you feel like you have this established, then on your inhale allow the pelvic floor to relax, so you can exhale and gently lift the pelvic floor about 20% contraction to get a deeper integration. You want to think of this as a rhythmical balance, so nice and fluid. Inhaling to the base of the pelvis and exhaling gently lifting the pelvic floor.

4. Integration

Lastly, it’s time for integration. This is to be done with short foot. Standing on one leg, sitting the hips back, knees slightly bent, taking a breath in, while your foot relaxes then exhale and gently root the tips of the toes into the ground. That will naturally lift the arch and lift the metatarsal heads or ball of the foot.

So whether you have hip pain or hip tightness and are constantly stretching your hips, hopefully, this video will give you a little bit of insight to allow you to think about your hip differently and recognize that it is part of an integrated unit. It is really important to understand how that works as it relates to stabilization and movement

If you’d like to schedule a free 15 minute virtual discovery session, please email drarianne@staging.movementparadigm.flywheelsites.com or text 302-373-2394 to schdule. We’d love to help you get healthy again!

For more content, make sure to subscribe to our YouTube channel here.

HOW TO GET YOUR FIRST PULL-UP

Have you convinced yourself that you’ll never be able to do a pull-up, or you’ve tried with bands and assistance, but you’ve been unsuccessful? With the right exercises, time, patience, dedication, and hard work, you can absolutely do a pull-up. Whether you’re a child, an adult, a man, or a woman, it doesn’t matter. You have the potential inside of you to do a pull-up.

Pull-ups are one of the greatest human fundamental strength movements that we all can do. However, before you work on pull-up progressions, you do want to make sure that you have checked a few boxes. So, here are the boxes you need to check.

1) Do you have good shoulder and scapular mobility?

To test this, see if you can get your arm completely overhead so that it is in line with your ear without pain or discomfort. If you can great, move on to the next box. If you can’t, that is what you want to start to work on first.

2) Do you have proper breathing mechanics?

To test this, see if you can breathe through your diaphragm as you inhale. This means having 360 degrees of intra-abdominal pressure. When you inhale, your abdomen will expand like when filling a balloon. Then, as you exhale, you’re creating this abdominal tension as your ribs descend towards your hips and you’re actively pulling your belly button in towards the spine, thinking of it as a corset. If you are still breathing from your neck and shoulders, it will make it very challenging to do a pull-up successfully.

3) Are you able to hold a hollow plank?

Are you able to control your body weight in a closed chain position (hands connected to the floor) while breathing and creating optimal tension throughout the body? Can you be strong, but relaxed?

Once you check those boxes, now you want to make sure that you’re prepared for the pull-up. So, let’s start with shoulder CARS (controlled articular rotations). For shoulder CARS, you’ll want to have good tension through the ground, feet strongly connected and rooted in, and ribcage down. From here, starting with your right arm, taking a breath in, slowly bring your arm up, ribs coming down. When your arm is overhead, will first externally rotate, and then internally rotate keeping your arm as close to your body as you can, without losing this position.  Perform this next to the wall to maximize the effectiveness. The goal is to create this total-body tension to create active control of the shoulder. This will make sure your shoulders are prepped. Repeat for five in each direction.

Next, you can do the bear walk to make sure that you’re working on good scapular and shoulder control before pull-up progressions. Watch the video here to see how to perform this. Now, let’s get it to the five pull-up progressions you should do before completing a full pull-up.

5 Pull-Up Progressions You Should Do Before Completing A Full Pull-Up

Pull-up progression 1: Dead Hang

For the dead hang make sure that your hands are in line with your shoulders when hanging from the bar, you’re in a slight hollow position maintaining your breath, and your arms are in line with your ears. Aim to hold this for at least 30 seconds to a minute before going to the next progression.

Pull-up progression 2: Pull-up Prep

This is a very key part of the pull-up. You want to maintain the same hanging position, and then lower your shoulder blades, and then raise them back up slowly with control. You want to make sure you are maintaining the same alignment the whole time with your head in between your arms. Repeat this for as many reps as you can with high quality.

Pull-up progression 3: Isometric Hold

For the isometric hold, you’ll want to jump into the position by standing on something where you can reach the bar from. Once you grab onto the bar, pull yourself up using an underhand grip so your head is over the bar. (This grip is recommended to start before progressing to an overhand grip). You want to make sure you’re pulling the elbows down towards the ground maintaining that slight hollow position with a neutral head position you’re while breathing and head. Hold this position for 30 seconds to a minute.

Pull-up progression 4: Eccentrics

To work on strength, perform eccentric pull-ups. To do this slowly lower all the way to the bottom of the motion completely finishing it, and then returning to the top by standing on your block, so you can grab the bar again. You’re avoiding the concentric portion and just focusing on the eccentric portion. Make sure to maintain your hollow position, breathe, and keeping nice control. Repeat for as many reps as possible with control. Progress to five sets of five for three to six weeks.

Pull-up progression 5: Bringing It All Together

Now you’ll begin to put these together, starting with an isometric hold into your eccentric, and then a pull-up prep.

Now you’re ready to perform the full pull-up! Finish the motion completely and finish with the pull-up prep at the bottom.

This may take you weeks to months depending on your level of fitness. Make sure to master the progressions before moving on.  

Pull-ups require patience, hard work, time, and dedication. However, I’m confident that you will be able to perform this movement while doing all of these progressions. Remember you still want to build overall strength, so make sure to incorporate other types of total body strength training to enhance your progressions and performance with this movement.  A common question is “should I do assisted pull-ups with bands?” They are not recommended because they do not build the fundamental strength required for a pull-up. Please make sure to not take any shortcuts and work on the progressions.

Reach out for a 15-minute FREE discovery session to see how we can help you on your journey.

For more content, make sure to subscribe to our YouTube channel here.

Other things that may interest you:

Vagus Nerve Hack | Pelvic Floor Hack

5 steps to addressing SI Joint pain | the truth about SI

The benefits of GROUNDING | Earthing

5 MOVEMENT SNACKS | Working at Home During Quarantine

I know that many of you have been working at your desk all day during this quarantine. You may not be getting up as much and probably not feeling as great as you normally do. These simple exercises can be done at your desk or the surrounding area. Rather than heading to the kitchen, here are five movement snacks that you could do throughout your day to help you get focused, energized, and maintain your mobility.

1. Cross Crawl Pattern

The cross crawl pattern will stimulate the right and left hemispheres of the brain, ultimately waking up the logical and the creative side of your brain.

To do this exercise, while sitting, place your hands behind your head, and then exhale as you bring your elbow to your opposite knee. You do not need to touch each direction but just try your best. Repeating for a series of 15 to 20 repetitions. You can also do this from standing, and the same idea, bring elbow to opposite knee. View the exercise HERE.

2. Foot Release

The foot release can be done from a seated or standing position. You can use a ball that’s the size of a golf ball. I love the RAD rounds for this. The foot release is really designed to improve the mobility of your foot and hydrate the fascia, helping to keep it elastic. You’re also stimulating certain receptors in the bottom of the feet that have a direct link to your brain. From an  Eastern medicine perspective, reflexology, by applying pressure to reflex areas, is said to remove energy blockages and promote health in the related body area and research has shown to stimulate the vagus nerve as well. I recommend this to nearly every patient. It is a very powerful exercise, very simple to do, and feels amazing. It will take you just a few minutes on each side.

To do this exercise, use a small ball on the six different points on the bottom of your foot that will be included in the picture below. You’ll hold the ball in each 
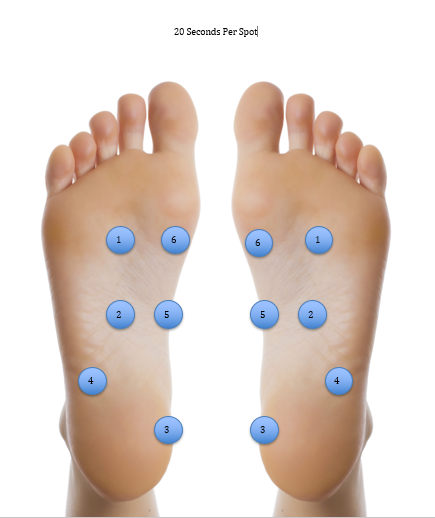
spot for about 20 seconds, making sure that you feel a nice release (about 75% decrease in pain/discomfort), and then moving on to the next spot. View how to do the exercise HERE.

foot release
6 point Foot Release

3. Half Salamander

The half salamander exercise is a cranial nerve reprogramming exercise. The goal of it is to improve the thoracic mobility, ribcage, and sternum motion, and improve the blood flow around the vertebral arteries, and ultimately the upper cervical spine. It is very simple to do and you could do it multiple times throughout the day to have a cumulative effect on the neck, shoulder, and thoracic mobility.

To do this exercise, first, check your cervical range of motion. You can do this by looking to the right and left to see if there’s any asymmetry or restriction. Then, place your hands behind your head and you’re going to side bend to one side and then look with your eyes in the opposite direction. Make sure to keep your face forward, and you’ll hold this for 30 to 60 seconds. You would of course repeat on the other side, and then you would recheck your cervical range of motion, which should be improved. To see how to do the exercise, click HERE.

4. Thoracic Rotation and Side Bend

The thoracic rotation and side bending exercise is also a great exercise to do to help negate some of the sitting postures of that forward, often rounded position. You’re using your eyes to really help improve the range of motion in the upper back. Your eyes have a direct connection to the muscles in the back of your head, the occiput muscles. So, you’re using your eyes to really drive by looking as far as you can. Each time you should be able to get successive improvements.

To do this exercise, first, check your thoracic range of motion by rotating to each side see if there are any restrictions or asymmetry. Then, place your hands behind your head and you’re going to look with your eyes all the way to the right. Next, rotate as far as you can to the right keeping your hands behind your head. When you get to your end range, side bend. Come back to the center and return to your start position. The next time, you’ll rotate even further, looking with your eyes as far as you can to the right. Then, once again side bend. Each time you should be able to get farther and farther. Repeat three times on each side, and then recheck your thoracic range of motion, which should be improved. To see the exercise, click HERE.

5. Hip Mobility 90/90

Hip mobility is very important, so you want to make sure that you take the opportunity to get down on the floor and maintain your hip motion, especially if you are going to be sitting all day at your desk. You do want to make sure that this is active-controlled mobility, so you want to make sure that you’re breathing diagrammatically in each position to convince your nervous system that you are safe in that position. Go to the point where you feel some discomfort, but it should never be painful.

To do this exercise, you will start with a 90/90 hip position. From this position, slowly rotate to the other side maintaining an upright trunk position. Using your breath, exhaling, as you rotate, and then taking your big inhale to prep the motion. Make sure you are doing this in a comfortable position and that there is no pain. Then, move into a reaching forward position on the front leg.  Use tension by pushing into the ground, pushing the ground away, and hinging from the hip. It may be farther for some than others. Next, you’ll open your back up and rotate to the front leg. You’re really trying to open your chest and extend your hip on that side. Make sure to really squeeze your glute to maintain that position while breathing. To see how to perform, click HERE.

Summary

I hope that was helpful and that you gained some new movement snacks that you can do throughout your workday, especially during this quarantine. If this was helpful for you, please make sure to share it with your friends and family.  The rule of thumb is to move EVERY 30 minutes while working, so try one of these or take a quick stroll. Better yet, do both!

Reach out for a 15-minute FREE discovery session to see how we can help you on your journey.

For more content, make sure to subscribe to our YouTube channel here.

Other things that may interest you:

WHY DO YOU HAVE CRAVINGS | 4 reasons

Top 5 Vagus Nerve Hacks to Help You Relax and Restore

What To Eat To Improve Your Nerve Health | 10 NUTRIENTS

8 Common Mistakes in Your Plank & 8 Ways to Improve It

Have you ever done a plank or would like to know why you should do planks? Let’s discuss eight ways that you could potentially compensate in your plank and more importantly, eight ways to correct them.

Why are planks important?

The plank is considered an anti-extension, or back bending exercise, that is targeting the anterior (front) core. It really helps to improve the midline stability of the body. We need that for all movement patterns. If we think about our basic daily life patterns to our exercise patterns such as deadlifts, squats, and kettlebell swings, the plank is a foundational movement for all these. We’re not looking for perfection, we just want to maximize the effectiveness of the exercise that you’re doing. That’s what you want to do with all your training, but especially in this exercise.

8 Common Mistakes in Your Plank & 8 Ways to Improve It

So, let’s take a look at compensations you could be doing in your plank and ways to improve on them.

1) Holding for time

When you set up with the timer in front of you and you hold as long as you can, you are probably not getting the benefits of the exercise. It is easy to “power through” with your legs and arms. Some try to hold for three or five minutes, but really that’s not the point of the plank.

What to do instead:

Use your breath as your repetition

Instead of using time, use your breath as your repetition. When you get in the plank position, take a nice big inhale through your nose and exhale (out of your nose or mouth) drawing the belly button toward the spine and bringing your rib cage down. You want to hold that position for as many breaths as you can, which typically is about five to ten breaths.

2) Breath Holding

When people do not breathe during the movement pattern it can cause your body to recruit other muscles such as your back or neck muscles, and more importantly, you won’t be getting the most out of your plank.

What to do instead:

As we talked about using your breath versus time, learning how to breathe properly in the plank and all movement is very important. As you’re inhaling, your abdomen is expanding 360 degrees, when you exhale, the belly button goes in towards the spine and ribs come down to create some tension and bracing. When you are using your breath as your repetition and you are doing it properly, I can assure you that it will be many fewer reps than what you were probably doing already.

3) Looking up or looking down during your plank

Looking up with a hyperextended neck or just the opposite, looking down, can cause changes in how the body is stabilizing. If you are already having trouble with stabilization, this matters!

What to do instead:

Gaze towards the floor, holding your neck position nice and strong. This will prevent any discomfort and make sure that you’re stabilizing through the whole anterior chain in the front of your body.

4) Sagging your low back

The low back drops down or sags when you hold your plank position. You may even feel a little “tight” in your low back. This also causes a whole chain reaction and affects how you are stabilizing.

What to do instead:

Try slightly tucking the pelvis. You want to think about it as if your pelvis was a bucket of water and you are pouring it out the back. This little tuck will bring the ribcage over top of the pelvis. That will give you a much stronger position through the trunk, and it allows us to really maximize the recruitment of the front of the core.

5) Having your butt up in the air

This means that you’re really not stabilizing.  This could be intentional and it could be to accommodate certain movement patterns or pathologies, like limited toe mobility. That is okay-that is your intent!

What to do instead:

Bring your body more parallel towards the ground, and in which case, your shoulders will be slightly higher than your pelvis. You will have a slight angle there, but that is normal.

6) Bending the knees in the plank

When you bend your knees, you lose control of your whole body, especially the low back. A lot of times the low back sag and knee bent position will go together.

What to do instead:

Think about lengthening through your heel. That will give you a really nice strong tension position.

7) Sinking your shoulders

This is a really important one because a lot of times we see the shoulder blades sinking down. It can also commonly be referred to as “winging” shoulder blades. That creates a lot of stress on the shoulder, and it really destabilizes the trunk.

What to do instead:

Press the ground away. Spread your wings, which means that you’re spreading the shoulder blades. That gives you a really nice strong connection of some of the important scapular stabilizers that actually intimately connect with your core. This is really powerful because you get a lot more tension through the whole body when you do that.

8) Thinking you should do planks to improve low back pain

The truth is that when there is pain, there is decreased motor control, which means decreased stability, coordination, timing, sequencing, and activation of all these muscles. If you have acute low back pain and you think that doing a plank is going to help it, it might not be the best choice of exercise at that time. You want to make sure that you’re in a good place and you’ve been instructed by a qualified health professional to direct you on when this is appropriate.

What to do instead:

Focus on breathwork first and activating the deep core stabilizers. When you are in pain, it’s going to be more important to focus on the reflexive stabilizers, which is the inner core.

Summary

In summary, the plank could be a great exercise to include in your training program. If you’re already doing the plank, you can take this opportunity to clean up any compensations that we discussed today.

In summary, here’s how to do a proper plank:

  1. When you set up, you can think of setting your index fingers parallel, and having a really active hand, which means spreading those fingers really wide and that will take pressure off of the wrist.
  2. Place your hands directly under your shoulders and step back into that high plank.
  3. Make sure that the head is nice and neutral, keeping the eyes gazing at the floor.
  4. Press the ground away spreading those wings  (shoulder blades) with a slight tuck in the pelvis to stack the ribcage.
  5. Use your breath as a repetition.
  6. Lastly, lengthen through the heels to keep that strong position.

Reach out for a 15-minute FREE discovery session to see how we can help you on your journey.

For more content, make sure to subscribe to our YouTube channel here.

Other things that may interest you:

How to Understand and Eliminate Low Back Pain

Why you should stop “stretching” your hip | HIP PAIN

How to train your core without crunches